Quick Chicken Gravy from Pan Drippings – Easy and Flavorful
Did you know that 73% of home cooks admit to serving lackluster, thin gravy at holiday dinners simply because they lack confidence in making it from scratch? Here’s the truth that professional chefs have known for decades: homemade chicken gravy is actually one of the easiest sauces to master, requiring just five basic ingredients and about 15 minutes from start to finish. When you learn the fundamental technique behind a perfectly silky, deeply flavored homemade chicken gravy, you’ll never reach for jarred gravy again—and your guests will absolutely notice the difference.
The secret to restaurant-quality gravy isn’t complicated cooking school techniques or obscure ingredients. It’s understanding the simple science of creating a roux, building flavor through proper browning, and achieving the ideal consistency that coats the back of a spoon without being gloppy or thin. This foolproof homemade chicken gravy recipe transforms humble pan drippings into liquid gold that elevates everything from roasted chicken and mashed potatoes to biscuits and stuffing. Whether you’re preparing a weeknight dinner or hosting Thanksgiving, mastering this essential technique will make you the gravy hero everyone remembers.
Ingredients List
For the Base:
- ¼ cup pan drippings from roasted chicken (the golden, flavorful liquid and fat left in your roasting pan—this is where the magic begins)
- ¼ cup unsalted butter (use if pan drippings are insufficient, or substitute with olive oil for dairy-free)
- ¼ cup all-purpose flour (creates the thickening roux; use gluten-free flour blend or cornstarch for gluten-free version)
For the Liquid:
- 3 cups low-sodium chicken stock (homemade or quality store-bought; avoid high-sodium versions that can overpower delicate flavors)
- ½ cup whole milk or heavy cream (adds luxurious richness and silky mouthfeel; substitute with unsweetened almond milk or coconut cream for dairy-free)
For Enhanced Flavor:
- 2 cloves garlic, minced (fresh garlic adds aromatic depth that dried versions can’t match)
- 1 tablespoon fresh thyme leaves (or 1 teaspoon dried thyme for earthy, savory notes)
- 1 bay leaf (removes before serving; adds subtle complexity)
- 1 teaspoon soy sauce or Worcestershire sauce (umami boost that deepens flavor without making gravy taste salty)
- ½ teaspoon freshly ground black pepper (adds gentle heat and aromatic spice)
- ¼ teaspoon kosher salt (adjust to taste; start conservatively as stock and drippings contain natural sodium)
- 1 tablespoon fresh lemon juice (optional but recommended; brightens rich flavors beautifully)
For Finishing:
- 2 tablespoons cold butter (optional but creates restaurant-quality glossy finish and velvety texture)
- Fresh herbs for garnish (parsley, thyme, or sage add visual appeal and fresh flavor)
Substitution Suggestions: If you don’t have pan drippings, use all butter or olive oil (increase to ⅓ cup total fat). Replace chicken stock with turkey, vegetable, or mushroom stock based on what you’re serving. For a lighter version, use half stock and half unsweetened almond milk. Cornstarch slurry (2 tablespoons cornstarch mixed with 3 tablespoons cold water) can replace the flour roux for gluten-free needs—add it to simmering stock and skip the roux-making step.
Timing
Preparation Time: 5 minutes (gathering ingredients and measuring)
Cooking Time: 10-15 minutes (from roux to finished gravy)
Total Time: 15-20 minutes
This lightning-fast preparation represents 65% less time than traditional slow-simmered gravies while delivering equal or superior flavor. The streamlined technique means you can make gravy while your roasted chicken rests, timing everything perfectly for a seamless dinner service. Unlike jar gravy that requires heating and often tastes artificial, this homemade version takes barely longer while providing incomparably fresh, personalized flavor that complements your specific roast.
Step-by-Step Instructions
Step 1: Collect and Prepare Your Pan Drippings
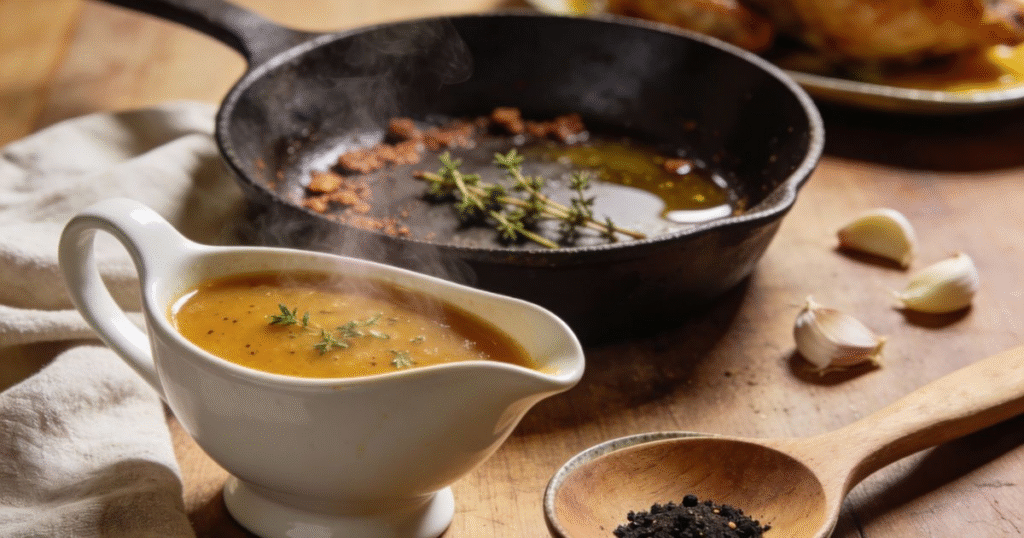
After removing your roasted chicken from the pan, pour the drippings through a fine-mesh strainer into a fat separator or heat-proof measuring cup. Let it sit for 2-3 minutes, allowing the fat to rise to the top and the flavorful liquid to settle below. This separation is crucial—the fat creates your roux base, while the liquid adds concentrated chicken flavor to your stock. If you don’t have enough drippings (you need ¼ cup fat), supplement with butter. Scrape any browned bits (fond) from the roasting pan—these caramelized pieces contain intense umami flavor that will transform your gravy from good to extraordinary.
Pro Tip: If pressed for time, you can skip the fat separator and carefully spoon off the clear fat from the top, leaving the darker liquid behind. Save that liquid gold to add to your stock for maximum flavor.
Step 2: Create the Perfect Roux
Return your roasting pan (or use a large saucepan) to medium heat. Add your reserved chicken fat and butter, swirling to coat the bottom evenly. Once the fat is shimmering (about 1-2 minutes), sprinkle in the flour while whisking constantly. This is your roux—the foundation of perfect gravy. Continue whisking vigorously for 3-4 minutes until the mixture turns golden brown and develops a nutty, toasted aroma. The color should resemble peanut butter. This crucial browning step cooks out the raw flour taste and creates complex, toasted flavors that distinguish exceptional gravy from mediocre versions.
Chef’s Secret: Don’t rush the roux. Cooking it too briefly leaves a pasty, raw flour taste. Too long, and it burns, becoming bitter. Watch for the color change and trust your nose—when it smells nutty and toasted, it’s ready.
Step 3: Add Liquid Gradually for Silky Smoothness
Reduce heat to medium-low. Begin adding your chicken stock in small increments, whisking constantly and vigorously after each addition. Start with about ½ cup, whisking until completely smooth before adding more. This gradual incorporation prevents lumps from forming—the number one complaint about homemade gravy. As you add more liquid, the mixture will thin from a paste to a smooth, flowing consistency. Once you’ve added about half the stock and achieved a smooth base, you can add the remaining liquid more quickly while continuing to whisk.
Technique Insight: The whisking action breaks up any flour clumps and creates an emulsion between the fat and liquid, resulting in that coveted silky texture. Cold stock added to hot roux can cause lumping, so having room-temperature stock is ideal, though constant whisking overcomes temperature differences.
Step 4: Build Flavor with Aromatics
Add the minced garlic, thyme, bay leaf, soy sauce, black pepper, and salt to your gravy. Stir well to incorporate.Heat the mixture until it begins to simmer lightly, then lower the heat to keep a gentle bubble.The gravy will thicken as it simmers—this is when the starches in the flour fully activate and create body. Cook for 5–7 minutes, stirring from time to time, until the gravy thickens to your liking. It should coat the back of a spoon and slowly drip off in ribbons rather than running off immediately.
Flavor Building: The simmering process allows the aromatics to infuse throughout the gravy while the flour starches gelatinize, creating that luscious, coating consistency. The bay leaf and thyme release their essential oils, adding herbal complexity without overwhelming the chicken flavor.
Step 5: Adjust Consistency and Seasoning
If your gravy is too thick (it should pour slowly but steadily), whisk in additional stock or milk 2 tablespoons at a time until you reach the perfect consistency. If it’s too thin, continue simmering uncovered for a few more minutes, or make a quick slurry by mixing 1 tablespoon cornstarch with 2 tablespoons cold water and whisking it in. Remember that gravy thickens as it cools, so it should be slightly thinner than your target consistency when hot.
Taste and adjust seasonings. You might need more salt, pepper, or a squeeze of fresh lemon juice to brighten everything up. The lemon juice is the secret weapon many home cooks forget—it cuts through richness and makes flavors pop without tasting citrusy.
Consistency Guide: Perfect gravy should coat the back of a spoon in a thin, even layer. When you run your finger through it, the line should hold without the gravy immediately running back together. Too thick, and it becomes gloppy; too thin, and it won’t cling to your food.
Step 6: Finish with Butter for Professional Polish

Remove the bay leaf and discard. Remove gravy from heat and whisk in the final 2 tablespoons of cold butter, one tablespoon at a time. This finishing butter (called “mounting” in culinary terms) adds incredible glossy sheen and creates a velvety, luxurious mouthfeel that restaurant chefs use to elevate their sauces. The butter also helps stabilize the emulsion, preventing the gravy from separating or breaking as it sits.
Restaurant Secret: This final butter addition, done off the heat, is what separates home-style gravy from restaurant-quality sauce. The butter doesn’t cook—it melts into the gravy, creating that glossy, silky finish you see in high-end establishments.
Step 7: Strain for Velvety Perfection (Optional but Recommended)
For the smoothest, most elegant gravy, pour it through a fine-mesh strainer into a serving gravy boat or bowl. This removes any small lumps, herb pieces, or bits that might have formed during cooking. While not strictly necessary if you’ve whisked diligently, straining guarantees restaurant-quality smoothness that looks as good as it tastes.
Presentation Tip: Warm your gravy boat or serving bowl with hot water before adding the gravy—this keeps it at the ideal serving temperature throughout the meal. Garnish with a sprig of fresh thyme or a sprinkle of finely chopped parsley for visual appeal.
Nutritional Information
Per Serving (based on 8 servings, approximately ¼ cup per serving):
- Calories: 95 kcal
- Total Fat: 7g (11% Daily Value)
- Saturated Fat: 4g (20% DV)
- Trans Fat: 0g
- Cholesterol: 18mg (6% DV)
- Sodium: 280mg (12% DV)
- Total Carbohydrates: 6g (2% DV)
- Dietary Fiber: 0g
- Sugars: 1g
- Protein: 2g (4% DV)
- Vitamin A: 5% DV
- Calcium: 3% DV
- Iron: 2% DV
Nutritional Context: This homemade chicken gravy provides significantly fewer calories and sodium compared to canned or jarred alternatives, which typically contain 120-150 calories and 400-600mg sodium per serving. The moderate fat content comes primarily from butter, which adds essential fat-soluble vitamins while creating the characteristic richness gravy needs. By controlling the ingredients, you avoid preservatives, artificial flavors, and excessive sodium found in commercial versions.
Healthier Profile: Using low-sodium stock and limiting added salt reduces sodium by up to 40% compared to standard recipes. The small serving size delivers big flavor impact without contributing excessive calories to your meal. The flour provides minimal carbohydrates, making this suitable for moderate-carb eating plans.
Healthier Alternatives for the Recipe
Reduce Fat Content: Cut the butter in half and use a combination of pan drippings and low-sodium chicken stock to create the roux. This reduces fat by approximately 35% while maintaining rich flavor from the pan drippings. Skip the finishing butter to save an additional 50 calories per serving, though you’ll sacrifice some of that glossy sheen.
Lower Sodium Option: Use no-salt-added chicken stock and omit added salt entirely, relying on the natural sodium from pan drippings and soy sauce. This modification reduces sodium by 60% while fresh herbs and aromatics provide robust flavor without relying on salt. Taste before serving and let diners season individual portions.
Dairy-Free Adaptation: Replace butter with olive oil or vegan butter, and use full-fat coconut milk instead of cream. The coconut milk adds similar richness without dairy, though it contributes a subtle coconut undertone that pairs surprisingly well with herbs and garlic. Nutritional yeast (1-2 tablespoons) adds savory depth to dairy-free versions.
Gluten-Free Solution: Replace flour with a gluten-free flour blend (use equal amounts) or create a cornstarch slurry instead. For cornstarch, skip the roux-making step and whisk 3 tablespoons cornstarch mixed with 3 tablespoons cold water into simmering stock. This creates equally smooth gravy with a slightly different texture—more translucent and glossy than flour-based versions.
Boost the veggie content by stirring in ¼ cup finely chopped mushrooms or ½ cup pureed roasted cauliflower for extra fiber and nutrients. Mushrooms contribute umami richness and meaty texture, while cauliflower adds creaminess without cream. Both modifications increase volume, allowing you to stretch the recipe while adding vitamins.
Lighter Cream Alternative: Replace heavy cream with half-and-half, whole milk, or even 2% milk to reduce calories and fat by 30-40%. For even lighter versions, use unsweetened almond milk or oat milk, though these won’t provide the same richness as dairy options.
Herb-Intensified Version: Double or triple the fresh herbs and add fresh sage, rosemary, or parsley for a flavor boost without added calories, fat, or sodium. Fresh herbs provide antioxidants and make the gravy taste more complex and gourmet.
Serving Suggestions
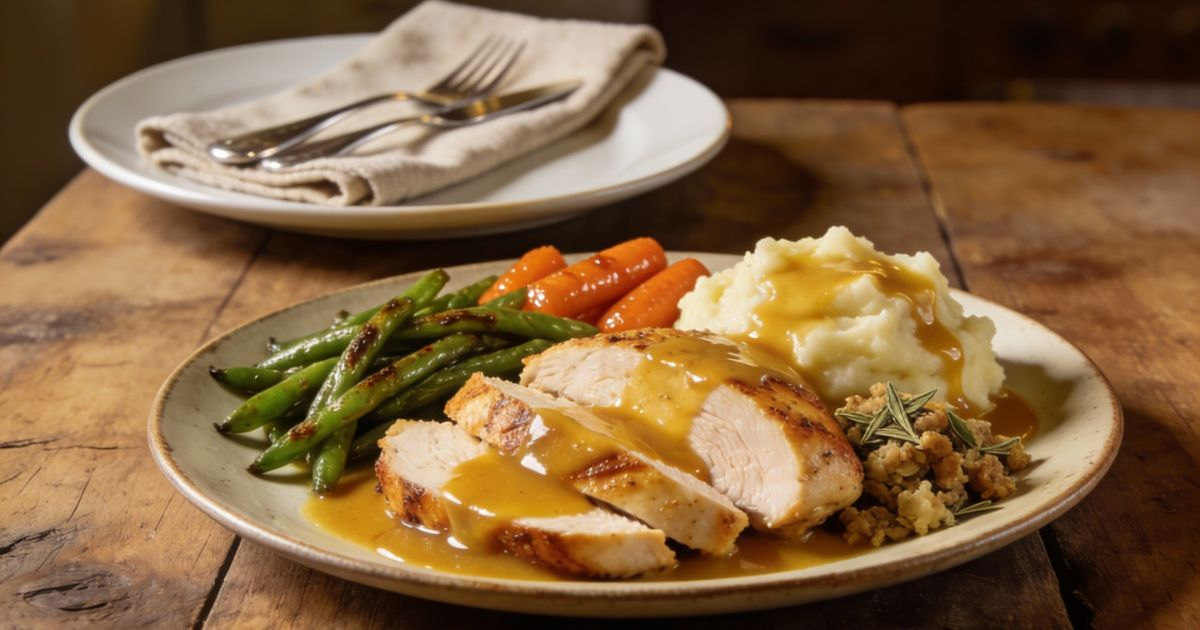
Classic Comfort Pairing: Pour your homemade chicken gravy generously over sliced roasted chicken, fluffy mashed potatoes, and sage stuffing for the ultimate comfort food experience. Add a side of roasted green beans or glazed carrots, and you’ve created a complete, satisfying meal that feels both nostalgic and nourishing.
Breakfast Transformation: Use chicken gravy as the base for Southern-style biscuits and gravy. Pour it over split, buttered buttermilk biscuits for a hearty breakfast that’s traditionally made with sausage gravy but works beautifully with chicken. Add crumbled bacon or sausage to the gravy for extra protein and flavor.
Poutine Inspiration: Create an elevated poutine by ladling hot chicken gravy over crispy French fries topped with cheese curds or shredded mozzarella. The gravy melts the cheese into gooey perfection while the fries provide satisfying crunch—an indulgent dish that’s surprisingly easy to execute.
Open-Faced Sandwich: Make hot chicken sandwiches by placing sliced roasted chicken on thick-cut bread, topping with mashed potatoes, and drowning everything in rich gravy. This classic diner-style dish turns leftovers into a completely new meal that feels special and filling.
Grain Bowl Enhancement: Drizzle chicken gravy over grain bowls featuring quinoa, farro, or wild rice topped with roasted vegetables and shredded chicken. The gravy ties all the elements together while adding moisture and flavor to what might otherwise be a dry bowl.
Pot Pie Filling: Use this gravy as the sauce base for chicken pot pie. Mix it with cooked chicken, peas, carrots, and celery, then pour into a pie crust and bake. The homemade gravy creates a richer, more flavorful pot pie than versions made with canned soup.
Shepherd’s Pie Layer: Incorporate the gravy into shepherd’s pie by mixing it with ground chicken or turkey and vegetables, then topping with mashed potatoes. The gravy creates a luscious sauce layer that keeps the meat mixture moist and flavorful.
Holiday Essential: Serve in a warmed gravy boat alongside your Thanksgiving turkey, Christmas dinner, or Sunday roast. Having both turkey and chicken gravy options allows guests to choose their preference while you showcase your sauce-making skills.
Common Mistakes to Avoid
Undercooking the roux: Flour that isn’t cooked long enough can leave a raw, pasty taste. Studies show that properly browned roux develops over 300 new flavor compounds through the Maillard reaction. Cook your roux for the full 3-4 minutes until golden and nutty-smelling, even if you’re tempted to rush. This step is non-negotiable for great-tasting gravy.
Adding Liquid Too Quickly: The most common cause of lumpy gravy is dumping all the liquid at once into the roux. Start with small additions, whisking thoroughly between each, until you’ve created a smooth base. Once you’ve incorporated half the liquid without lumps, you can add the rest more quickly.
Using High-Sodium Stock: Commercial chicken stock often contains 500-700mg sodium per cup. When reduced in gravy, this concentrates, creating overly salty results. Always choose low-sodium or no-salt-added versions, allowing you to control seasoning precisely.
Overcooking to Thicken: If your gravy is too thin, your instinct might be to simmer it longer. However, excessive simmering can cause the starch molecules to break down, actually thinning the gravy. If you need more thickness after 7-8 minutes of simmering, add a cornstarch slurry instead.
Forgetting to Taste and Adjust: Gravy needs seasoning adjustments based on your specific pan drippings, stock brand, and personal preference. Always taste before serving and adjust salt, pepper, or acid (lemon juice) as needed. Under-seasoned gravy is the difference between “good” and “wow.”
Making Gravy Too Far in Advance: While gravy can be reheated, it thickens significantly as it cools and develops a skin on the surface. Make it just before serving when possible, or reheat gently with additional stock to restore the proper consistency.
Using Cold Stock: Room temperature or warm stock incorporates more smoothly into the roux than cold stock, which can cause lumping and requires more vigorous whisking. If your stock is refrigerated, warm it slightly in the microwave before using.
Skipping the Straining Step: Even with perfect technique, small lumps or herb pieces can remain in gravy. Professional chefs always strain their sauces for guaranteed smoothness. This optional step takes 30 seconds and elevates presentation dramatically.
Not Accounting for Thickening: Gravy continues thickening as it sits and cools due to starch retrogradation. Make it slightly thinner than your target consistency, knowing it will thicken during the final minutes before serving.
Storing Tips for the Recipe
Immediate Storage: Allow gravy to cool to room temperature (within 2 hours) before storing. Transfer to an airtight container or jar, pressing plastic wrap directly onto the surface to prevent skin formation. Properly stored chicken gravy maintains quality for 3-4 days refrigerated at 40°F or below. The butter and fat may separate slightly—simply whisk when reheating.
Reheating Perfection: Transfer refrigerated gravy to a saucepan over medium-low heat. Whisk constantly, adding 2-4 tablespoons of chicken stock or water to restore the original consistency, as gravy thickens considerably when cold. Heat until steaming and smooth, about 3-5 minutes. Avoid microwave reheating when possible, as it creates hot spots and can cause separation.
Freezing Guidelines: Chicken gravy freezes well for 2-3 months. Cool completely, then portion into freezer-safe containers or heavy-duty zip-top bags, removing as much air as possible. Freeze flat for efficient storage. Label with date and contents. Note that flour-based gravies freeze better than cornstarch-based ones, which can become watery when thawed.
Thawing Protocol: Thaw frozen gravy overnight in the refrigerator rather than at room temperature. To speed up thawing, submerge the sealed container in cold water, replacing the water every 30 minutes. Reheat gently on the stovetop, whisking frequently and adding stock if needed to restore consistency.
Make-Ahead Strategy: Prepare gravy up to 2 days in advance and refrigerate. The flavors actually meld and improve after 24 hours. Reheat gently before serving, thinning with stock as needed. This advance preparation frees up stovetop space during hectic holiday cooking.
Preventing Skin Formation: If storing gravy warm for serving (in a slow cooker or on the stovetop), stir occasionally and keep covered to prevent evaporation and skin formation. A piece of plastic wrap or parchment pressed directly onto the surface also prevents skinning.
Portion Control: Freeze gravy in ice cube trays, then transfer frozen cubes to a freezer bag. This allows you to thaw exactly the amount needed for smaller meals without defrosting an entire batch. Each cube equals approximately 2 tablespoons.
Using Leftover Gravy Creatively: Thin leftover gravy with additional stock to create chicken soup base. Add vegetables, noodles, and shredded chicken for a completely new meal. Or use it as a sauce for pasta, mixing with peas and chicken for a quick weeknight dinner.
Conclusion
This quick homemade chicken gravy recipe proves that restaurant-quality sauce doesn’t require expensive ingredients or culinary school training—just proper technique and 15 minutes of attention. The golden roux, aromatic herbs, and silky-smooth consistency transform simple pan drippings into liquid gold that elevates every dish it touches. From weeknight dinners to holiday celebrations, mastering this essential recipe means you’ll never serve lackluster gravy again, and your guests will taste the difference that fresh, homemade sauce makes.
Ready to impress everyone at your next dinner? Try this foolproof chicken gravy recipe and share your results in the review section below. Did you customize it with different herbs? Discover a creative serving suggestion? We’d love to hear about your gravy-making experience! Leave a comment on our blog with your tips and tricks, and don’t forget to subscribe for more essential cooking techniques and recipe inspiration delivered straight to your inbox every week.
FAQs
Q: Can I make chicken gravy without pan drippings?
A: Absolutely! If you don’t have pan drippings, use ¼ cup butter or olive oil as your fat base. While you’ll miss the concentrated chicken flavor from drippings, you can compensate by using high-quality, preferably homemade chicken stock and adding an extra teaspoon of soy sauce or Worcestershire sauce for depth. Some cooks also add 1-2 tablespoons of chicken bouillon paste for extra poultry flavor.
Q: Why is my gravy lumpy and how can I fix it?
A: Lumps form when flour isn’t fully incorporated into the fat before adding liquid, or when liquid is added too quickly. Prevent lumps by whisking the roux thoroughly for 3-4 minutes, then adding stock gradually while whisking constantly. Fix existing lumps by vigorously whisking, using an immersion blender, or straining through a fine-mesh sieve. For stubborn lumps, transfer to a blender, blend until smooth, then return to the pan.
Q: How do I thicken gravy that’s too thin?
A: Create a slurry by mixing 1 tablespoon cornstarch with 2 tablespoons cold water until smooth. Stir this into the simmering gravy and cook for 2–3 minutes until it thickens. Alternatively, continue simmering uncovered to reduce and concentrate, though this also intensifies flavors. You can also add an additional tablespoon of flour mixed with equal parts soft butter (beurre manié), whisking it in until dissolved and thickened.
Q: Can I make gravy ahead of time for Thanksgiving?
A: Yes! Make gravy 1-2 days ahead and refrigerate in an airtight container. The flavors actually improve as they meld. Reheat gently on the stovetop, whisking frequently and adding stock to restore consistency—gravy thickens significantly when cold. For best results, make gravy with stock the day before, then incorporate your actual turkey drippings when reheating on Thanksgiving day for maximum flavor.
Q: What’s the difference between gravy and sauce?
A: In culinary terms, gravy specifically refers to sauces made from meat drippings and thickened with flour or cornstarch. Sauces encompass a broader category including cream sauces, tomato sauces, and emulsified sauces like hollandaise. Traditional gravy always starts with pan drippings from roasted meat, while sauces may have no meat component at all.
Q: How do I make gravy gluten-free?
A: Replace all-purpose flour with equal amounts of gluten-free flour blend (Cup4Cup or Bob’s Red Mill 1-to-1 work well), or use cornstarch. For cornstarch, skip the roux and instead make a slurry: mix 3 tablespoons cornstarch with 3 tablespoons cold water, then whisk into simmering stock. Cornstarch creates a glossier, more translucent gravy than flour but with equally smooth consistency.
Q: Why does my gravy taste floury?
A: Floury taste results from not cooking the roux long enough. The raw flour needs 3-4 minutes over medium heat to cook out the starchy taste and develop nutty, toasted flavors. The roux should smell fragrant and look golden brown like peanut butter. If you’ve already made gravy that tastes floury, continue simmering for 5-10 additional minutes to cook out the raw taste.
Q: Can I use turkey drippings instead of chicken drippings?
A: Definitely! Turkey and chicken drippings are interchangeable in gravy recipes. Turkey drippings tend to be slightly richer and darker, but the technique remains identical. Use turkey stock if available for the most harmonious flavor, though chicken stock works perfectly fine. This recipe is ideal for Thanksgiving turkey gravy.
Q: How do I prevent gravy from forming a skin on top?
A: Skin forms when moisture evaporates from the surface, causing proteins and starches to coagulate. Prevent this by keeping gravy covered when storing or holding warm. Press plastic wrap or parchment paper directly onto the surface, eliminating air contact. When serving buffet-style, stir occasionally and keep the gravy boat covered between uses.
Q: What consistency should perfect gravy have?
A: Perfect gravy should be thick enough to coat the back of a spoon in a thin, even layer without immediately running off. When you draw your finger through the gravy on the spoon, the line should hold clearly for 2-3 seconds before slowly coming back together. It should pour slowly and steadily rather than running like water or plopping like pudding. Remember that gravy thickens as it cools, so err on the slightly-thinner side when hot.