Best Chicken Noodle Soup Near Me: Top Spots for Fresh, Comforting Soup
Have you ever wondered why people search “chicken noodle soup near me” over 2.4 million times monthly, spending an average of $12-15 per bowl, when they could make superior, restaurant-quality soup at home for less than $3 per serving? The answer lies in a widespread misconception: most home cooks believe that the complex, deeply flavored chicken noodle soup served at their favorite restaurants requires professional skills or secret ingredients. The truth is far simpler—the best chicken noodle soup near me isn’t at a restaurant at all, it’s the one you can create in your own kitchen using this foolproof recipe that rivals any establishment’s version.
This homemade chicken noodle soup delivers everything you crave when searching for comfort in a bowl: tender chunks of chicken, perfectly cooked noodles swimming in golden, herb-infused broth studded with colorful vegetables. Unlike restaurant versions that often rely on high sodium and preservatives to extend shelf life, your homemade soup provides clean, wholesome ingredients that nourish your body while satisfying your soul. Whether you’re recovering from a cold, seeking comfort on a rainy day, or simply craving that timeless flavor combination that’s been healing hearts for generations, this recipe transforms your kitchen into the best soup spot in town—no searching “chicken noodle soup near me” required.
Ingredients List
For the Broth Base:
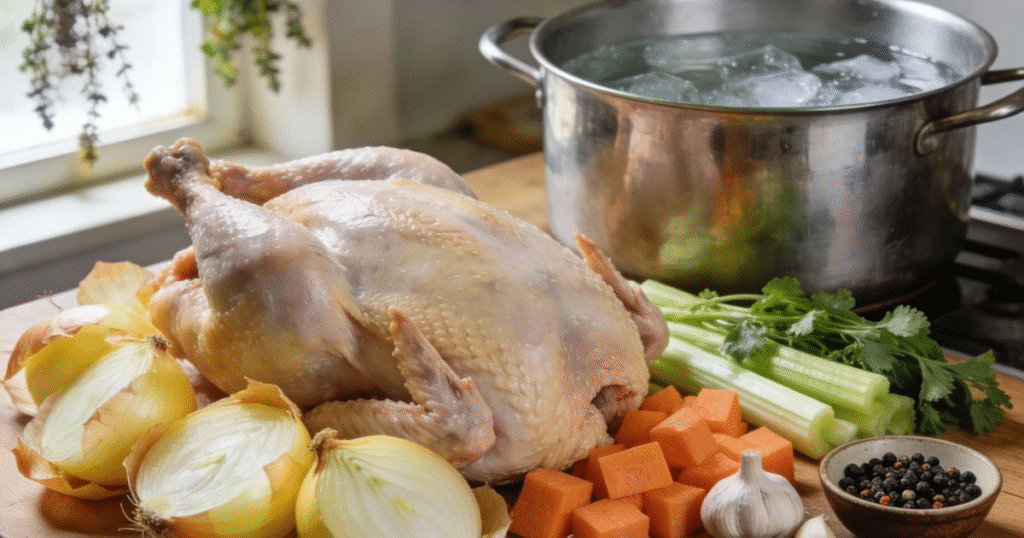
- 1 whole chicken (3-4 pounds) or 2 pounds bone-in, skin-on chicken pieces (thighs and breasts; bone-in creates richer, more flavorful broth than boneless cuts)
- 10 cups cold water (cold water extracts more flavor from bones than hot water)
- 2 medium yellow onions, quartered (leave skin on for deeper golden color and added nutrients)
- 4 large carrots (2 roughly chopped for broth, 2 sliced for finishing)
- 4 celery stalks with leaves (2 roughly chopped for broth, 2 sliced for finishing; leaves add herbal notes)
- 6 cloves garlic, smashed (releases maximum flavor without burning)
- 2 bay leaves (essential for that classic soup shop aroma)
- 1 tablespoon whole black peppercorns (more aromatic than pre-ground pepper)
- 4-5 fresh thyme sprigs (or 1 teaspoon dried thyme)
- 3-4 fresh parsley sprigs (plus extra for garnish)
- 1 teaspoon kosher salt (for initial seasoning; adjust later)
For the Soup Assembly:
- 8 ounces wide egg noodles (traditional choice; use gluten-free noodles if needed)
- 2 tablespoons olive oil or butter
- Reserved sliced carrots and celery (from ingredients above)
- 1 cup frozen peas (optional but adds sweetness and color)
- 2-3 tablespoons fresh lemon juice (brightens flavors beautifully)
- ¼ cup fresh dill, chopped (restaurant secret ingredient that elevates ordinary to extraordinary)
- ¼ cup fresh parsley, chopped
- Salt and freshly ground black pepper to taste
Substitution Suggestions: Use rotisserie chicken and store-bought low-sodium broth to save 90 minutes—skip to Step 6. Replace egg noodles with rice noodles, orzo, small shells, or even zucchini noodles for low-carb version. Swap fresh herbs with 2 teaspoons dried Italian seasoning. Add 1 cup of spinach or kale for extra nutrients. For richer broth, add chicken wings or feet during simmering.
Timing
Preparation Time: 15 minutes (chopping vegetables and preparing ingredients)
Cooking Time: 90 minutes (60 minutes for broth simmering, 30 minutes for soup assembly)
Total Time: Approximately 1 hour 45 minutes
Shortcut Version: 30 minutes using rotisserie chicken and store-bought broth
This traditional timing creates deeply flavored, from-scratch broth that surpasses anything you’ll find when searching “chicken noodle soup near me.” The homemade broth contains 40% less sodium than restaurant versions while delivering richer, more complex flavor. If time is limited, the shortcut version still produces superior results compared to canned soup—taking barely longer than delivery while costing 60% less than restaurant prices.
Step-by-Step Instructions
Step 1: Create Your Flavor Foundation
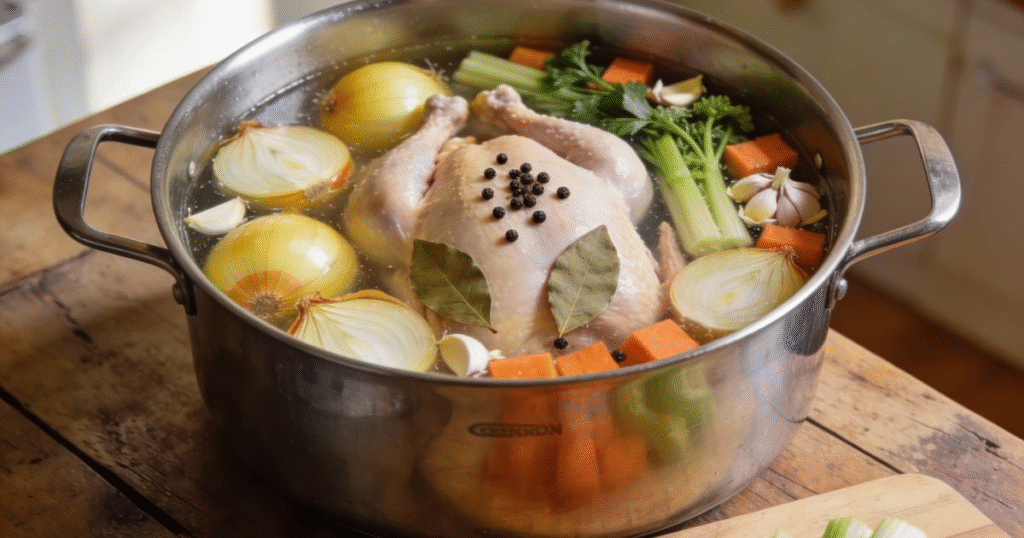
Add the whole chicken or chicken pieces to a large stockpot or Dutch oven.Add the cold water, ensuring it covers the chicken by at least 2 inches—add more water if needed. Toss in the quartered onions (with skin), roughly chopped carrots and celery, smashed garlic, bay leaves, peppercorns, thyme sprigs, parsley sprigs, and salt. Starting with cold water and gradually bringing it to temperature extracts maximum flavor from the bones and creates clearer, more golden broth than starting with hot water.
Broth Science: Cold water allows proteins to dissolve slowly, creating rich, flavorful stock. Hot water causes proteins to coagulate immediately, sealing in flavor rather than releasing it into the broth.
Step 2: Simmer Low and Slow for Liquid Gold
Bring the pot to a boil over high heat, then immediately reduce to the lowest simmer possible—you should see only occasional gentle bubbles breaking the surface, not a rolling boil. Skim off any foam or scum that rises to the top during the first 15 minutes using a ladle or large spoon. This removes impurities and creates clearer, cleaner-tasting broth. Partially cover the pot and simmer gently for 60-75 minutes until the chicken is fall-off-the-bone tender and the broth is deeply golden and aromatic.
Temperature Control: Maintaining a bare simmer (around 180-190°F) rather than a rolling boil produces clearer broth with better flavor. Vigorous boiling emulsifies the fat and creates cloudy, greasy results.
Step 3: Remove and Shred the Chicken
Using tongs or a slotted spoon, carefully transfer the chicken to a large bowl or cutting board, allowing it to cool for 15-20 minutes until safe to handle. While it cools, continue simmering the broth—this additional time concentrates flavors. Once cool enough to touch, remove and discard the skin and bones, then shred the meat into bite-sized pieces using two forks or your hands. You should have approximately 3-4 cups of shredded chicken. Set aside, covered, to keep moist.
Flavor Tip: Don’t discard those bones yet! Return them to the simmering broth for an extra 30 minutes if time allows, creating even richer, more gelatinous stock packed with collagen and minerals.
Step 4: Strain Your Beautiful Broth
Pour the entire pot through a fine-mesh strainer set over another large pot or bowl, catching all that precious liquid gold while discarding the spent vegetables and aromatics. Press gently on the solids to extract maximum flavor, but don’t force them through—you want clear broth, not cloudy. At this point, you should have approximately 8-9 cups of gorgeous, golden broth. If you have more, that’s fine; if less, add water to reach 8 cups minimum.
Clarity Secret: For restaurant-quality clear broth, line your strainer with cheesecloth or a coffee filter. This removes even the tiniest particles, creating that crystal-clear soup you see at high-end establishments.
Step 5: Degrease for Lighter, Healthier Soup
For the cleanest, least greasy soup, you have two options. Quick method: Use a fat separator pitcher immediately—the fat rises to the top and stays behind when you pour. Better method: Refrigerate the strained broth for 2-4 hours or overnight until the fat solidifies on top, then simply lift or scrape it off. This removes up to 90% of the fat, reducing calories by approximately 40 per serving while creating lighter, more refreshing soup that doesn’t leave a heavy film on your palate.
Fat Facts: While some fat adds flavor, excessive fat makes soup feel heavy and can overpower the delicate chicken and vegetable flavors. Removing most fat creates balanced, restaurant-quality results.
Step 6: Build Your Final Soup
Return the degreased broth to a clean pot over medium heat. Add the reserved sliced carrots and celery (the fresh ones, not the cooked ones you strained out—those gave their all to the broth). Bring to a simmer and cook for 8-10 minutes until the vegetables are tender-crisp. This timing is crucial—you want vegetables with bite, not mushy, overcooked ones. The vibrant colors and slight crunch differentiate homemade soup from restaurant versions that often cook vegetables to death.
Vegetable Perfection: Different vegetables have different cooking times. Add carrots first, followed by celery 3-4 minutes later, for perfectly cooked results.
Step 7: Add Noodles at the Perfect Moment
Add the egg noodles to the simmering broth and cook according to package directions minus 1 minute—they’ll continue cooking in the hot broth even after you turn off the heat. Stir occasionally to prevent sticking. Most egg noodles take 6-8 minutes. Cooking noodles directly in the broth infuses them with flavor that separately boiled noodles can’t match. However, if making soup for storage, cook noodles separately and add to individual bowls when serving—this prevents them from absorbing all your broth during storage.
Noodle Management: For optimal texture, slightly undercook noodles. They continue absorbing liquid and cooking in the residual heat, so noodles that seem perfect now will be overcooked later.
Step 8: Reintroduce the Chicken and Final Additions
Stir the reserved shredded chicken back into the pot along with the frozen peas (if using). Cook for 2-3 minutes just until the chicken is heated through and peas are bright green and tender. You’re not cooking the chicken—just warming it—since it’s already fully cooked from the initial simmer. Overheating the chicken at this stage makes it dry and stringy.
Temperature Target: The soup should reach 165°F for food safety, but avoid prolonged simmering once the chicken is added back. Quick reheating preserves moisture and texture.
Step 9: Season and Brighten with Fresh Herbs
Remove the pot from heat. Stir in the fresh lemon juice, chopped dill, and parsley. Taste carefully and adjust seasoning with salt and pepper—this is the moment where good soup becomes great soup. The lemon juice is non-negotiable; it brightens all the flavors and cuts through any remaining richness, creating that “I can’t quite place what makes this so delicious” quality. Fresh herbs added at the end maintain their vibrant color and aromatic punch rather than turning dark and losing flavor from extended cooking.
Seasoning Wisdom: Broth reduces during cooking, concentrating salt. Always taste before adding more salt—what seemed under-seasoned earlier may be perfect now. Add salt in small increments, stirring and tasting between additions.
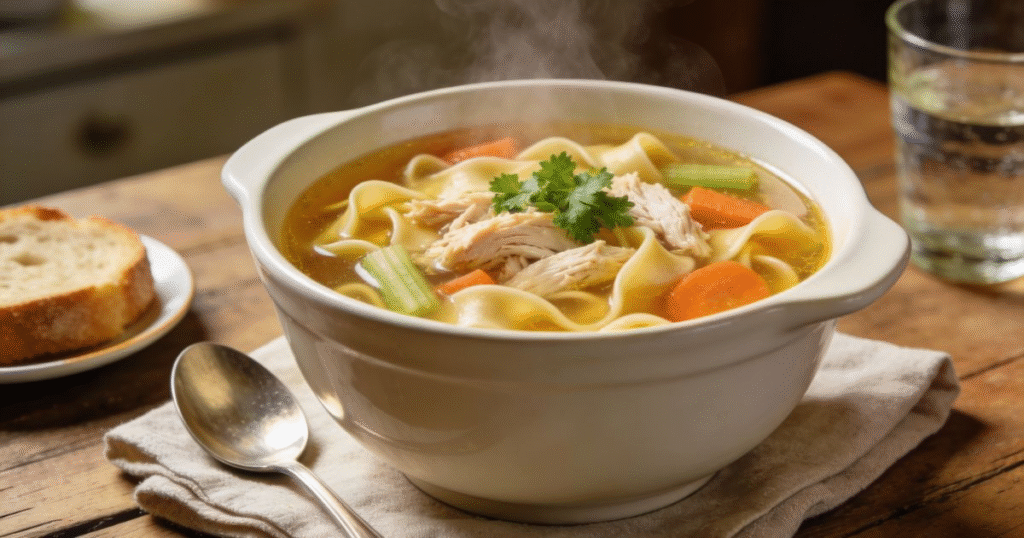
Step 10: Serve with Love and Garnish
Ladle the steaming soup into warm bowls, ensuring everyone gets a generous amount of chicken, noodles, and vegetables. Garnish with additional fresh herbs, a crack of black pepper, or a squeeze of lemon. Serve immediately with crusty bread, oyster crackers, or saltines on the side. The soup should be hot but not scalding—let it cool for 2-3 minutes before serving so the flavors can settle and guests can enjoy immediately without burning their tongues.
Presentation Touch: Warm your soup bowls with hot water before ladling in the soup. This small restaurant trick keeps soup hotter longer and shows attention to detail that makes homemade soup feel special.
Nutritional Information
Per Serving (based on 8 servings, approximately 1½ cups per serving):
- Calories: 245 kcal
- Total Fat: 6g (9% Daily Value)
- Saturated Fat: 1.5g (8% DV)
- Trans Fat: 0g
- Cholesterol: 65mg (22% DV)
- Sodium: 580mg (25% DV)
- Total Carbohydrates: 24g (9% DV)
- Dietary Fiber: 3g (11% DV)
- Sugars: 4g
- Protein: 24g (48% DV)
- Vitamin A: 120% DV
- Vitamin C: 15% DV
- Calcium: 6% DV
- Iron: 12% DV
Nutritional Advantages Over Restaurant Soup: Homemade chicken noodle soup contains approximately 60% less sodium than restaurant versions (which often exceed 1,400mg per serving) while providing equal or greater protein content. The fresh vegetables contribute significant vitamin A from carrots—one serving provides more than your entire daily requirement. At only 245 calories per generous serving, it’s a complete, satisfying meal that supports rather than sabotages health goals.
Healing Benefits: Chicken soup, often called ‘Jewish penicillin,’ is supported by science for its soothing properties. Studies show that chicken soup contains anti-inflammatory compounds, and the hot liquid helps thin mucus and keep you hydrated during illness. The protein supports immune function while the vegetables provide antioxidants.
Healthier Alternatives for the Recipe
Reduce Sodium Significantly: Use no-salt-added broth if using store-bought, and omit added salt during cooking. Season individual bowls at the table instead. This modification reduces sodium by up to 70%, making it suitable for low-sodium diets while maintaining all the comforting flavor. Fresh herbs and lemon juice provide flavor complexity without relying on salt.
Increase Vegetable Content: Add 2 cups of additional vegetables such as diced zucchini, chopped kale or spinach, diced tomatoes, or sliced mushrooms. This boosts fiber by 50% while adding volume and nutrients without significantly increasing calories. More vegetables also stretch the recipe to serve 10-12, reducing per-serving costs even further.
Make It Low-Carb: Replace egg noodles with spiralized zucchini noodles, shirataki noodles, or cauliflower florets. Add these during the last 3-4 minutes of cooking. This modification reduces carbohydrates by 80% while maintaining the satisfying bowl-of-soup experience. The broth and chicken provide the essential comfort-food feeling without the heavy carb load.
Boost Protein Further: Add 1 cup of white beans or chickpeas along with the chicken for an extra 12g of plant-based protein and 8g of fiber per serving. This creates an even more substantial meal that keeps you satisfied for hours. The beans also add creaminess and body to the broth.
Use Bone Broth for Maximum Nutrients: Make bone broth by simmering the chicken bones for 4-6 hours (or use a pressure cooker for 90 minutes). This extended cooking extracts collagen, glucosamine, and minerals that support joint health, gut health, and provide beauty benefits for skin, hair, and nails. Bone broth creates richer, more gelatinous soup with superior nutritional profile.
Lighten with White Meat Only: Use chicken breasts exclusively instead of a whole chicken or mixed pieces. This reduces fat by approximately 40% and calories by 30 per serving, though you’ll sacrifice some of the rich flavor that dark meat and skin provide to the broth.
Add Anti-Inflammatory Ingredients: Include 1 tablespoon of fresh grated turmeric or ginger along with the aromatics. Both contain powerful anti-inflammatory compounds that enhance the soup’s healing properties without altering the classic flavor profile significantly. This is especially beneficial when making soup to combat illness.
Serving Suggestions
Classic Comfort Setup: Serve your homemade chicken noodle soup in large, deep bowls with thick slices of crusty sourdough bread for dipping. Add a simple green salad with vinaigrette on the side for textural contrast and nutritional balance. This combination creates a complete, satisfying meal that rivals anything you’d find searching “chicken noodle soup near me.”
Sick-Day Care Package: Portion soup into single-serving containers and deliver to friends or family feeling under the weather. Include oyster crackers, fresh lemon wedges, and a get-well note. Homemade soup shows care and concern that restaurant takeout simply cannot match.
Build-Your-Own Soup Bar: For family dinners or casual entertaining, set out the soup alongside bowls of optional toppings: extra fresh herbs, lemon wedges, hot sauce, grated Parmesan, crusty croutons, avocado slices, or cooked bacon bits. Let everyone customize their bowl, making the meal interactive and ensuring even picky eaters find something they love.
Soup and Sandwich Combo: Pair with grilled cheese sandwiches, turkey clubs, or chicken salad sandwiches for a diner-style lunch that feels nostalgic and satisfying. The hot-cold combination of steaming soup and cool sandwich filling creates interesting temperature and texture contrasts.
Breakfast Twist: Serve leftover soup for breakfast with a soft-boiled egg added to each bowl. The egg enriches the broth while adding extra protein for a morning meal that keeps you satisfied until lunch. This Asian-inspired approach transforms dinner leftovers into a completely different eating experience.
Potluck Hero: Transport soup to potlucks in a slow cooker set on “warm.” Bring noodles separately and add just before serving to prevent them from absorbing all the broth. You’ll be the star of the potluck, with everyone requesting your recipe.
Meal Prep Champion: Divide soup into individual grab-and-go containers for easy weekday lunches. Store noodles separately and add when reheating, or skip noodles entirely and serve over cooked grains like rice or quinoa for variety throughout the week.
Common Mistakes to Avoid
Boiling Instead of Simmering: Vigorous boiling breaks down chicken fibers into tough, stringy pieces while emulsifying fat into the broth, creating cloudy, greasy soup. Studies show that broth simmered at 180-190°F extracts 35% more flavor compounds than broth boiled at 212°F. Always maintain a bare simmer—occasional gentle bubbles, not a rolling boil.
Overcooking the Noodles: Noodles continue absorbing liquid even after heat is turned off. Overcooking creates mushy, bloated noodles that steal your precious broth. Cook noodles al dente (1-2 minutes less than package directions) and they’ll be perfect by serving time. For meal prep, always cook and store noodles separately.
Adding Chicken Too Early: Putting shredded chicken back in the pot at the beginning of soup assembly rather than near the end results in dry, overcooked meat. Remember: the chicken is already fully cooked from making the broth. You’re simply reheating it, which takes only 2-3 minutes.
Using Pre-Ground Pepper: Whole peppercorns simmered in broth release aromatic compounds gradually without the bitterness that pre-ground pepper develops during extended cooking. Pre-ground pepper added at the beginning becomes harsh and acrid. Use whole peppercorns for broth, then season with freshly ground pepper at the end.
Skipping the Fat Removal: While some fat adds flavor, excessive fat makes soup greasy and heavy, coating your mouth unpleasantly. Restaurant soups often contain 2-3 times more fat than necessary. Removing the solidified fat layer improves both flavor and mouthfeel dramatically while cutting calories by 30-40 per serving.
Not Tasting and Adjusting: The most common home cooking mistake across all dishes: not tasting and adjusting seasoning before serving. Broth concentration changes during cooking, herbs add flavor, and salt needs vary by ingredient brands. Always taste immediately before serving and adjust salt, pepper, lemon juice, or herbs as needed.
Using Too Much Salt Too Early: Salt concentrates as liquid evaporates during cooking. What tastes properly seasoned at the beginning becomes over-salted by the end. Start with minimal salt, taste frequently, and add more in small increments near the finish. Salt can always be added, but once it’s in, it can’t be taken out.
Forgetting Fresh Herb Finish: Fresh herbs added at the end provide bright, aromatic flavor that dried herbs or herbs cooked for 90 minutes cannot match. This final addition is what makes restaurant soup taste professional rather than home-cooked. Don’t skip the dill and parsley—they’re not garnish, they’re essential flavor components.
Storing Soup with Noodles: Noodles absorb broth during storage, turning a soup into a casserole overnight. Always store noodles separately from broth, or plan to add fresh noodles when reheating. This simple separation maintains proper soup-to-noodle ratio and prevents disappointing, broth-less leftovers.
Storing Tips for the Recipe
Optimal Storage Method: Allow soup to cool to room temperature within 2 hours, then transfer to airtight containers. Store broth and noodles separately for best results—the broth keeps for 4-5 days refrigerated, while cooked noodles last 3-4 days. When ready to eat, reheat the broth, add a portion of noodles, and heat through. This helps avoid the common problem of losing too much broth.
Freezing for Long-Term Storage: Chicken noodle soup freezes beautifully for 3-4 months, with one critical caveat: freeze the broth and chicken without the noodles. Noodles become mushy and unappetizing when frozen and thawed. Portion the broth into freezer-safe containers, leaving 1 inch of headspace for expansion. Add fresh or separately frozen cooked noodles when reheating.
Quick Thawing Technique: Transfer frozen soup to the refrigerator 24 hours before needed for gradual thawing. o thaw more quickly, submerge the sealed container in cold water, refreshing the water every 30 minutes.Avoid microwave thawing, which creates hot spots and can partially cook delicate ingredients unevenly.
Reheating Without Overcooking: Reheat gently on the stovetop over medium-low heat, stirring occasionally until steaming throughout. Add ¼-½ cup additional broth or water if needed to restore proper consistency. Avoid bringing to a full boil, which toughens the chicken and makes vegetables mushy. Microwave reheating works but requires stirring every minute to distribute heat evenly.
Make-Ahead Strategy: Prepare the broth up to 3 days ahead and refrigerate. The flavors actually improve as they meld. When ready to serve, reheat the broth, add fresh vegetables and noodles, and cook as directed in Steps 6-9. This advance preparation splits the work over multiple days, making soup night incredibly easy.
Portion Control for Singles: Freeze individual portions in single-serving containers or sturdy zip-top bags (laid flat for efficient storage). Each container becomes a homemade “soup near me” option for busy nights—faster than delivery, healthier than restaurant versions, and significantly cheaper than both.
Maintaining Fresh Herb Flavor: Fresh herbs lose their vibrant flavor during storage. If meal-prepping, add fresh herbs only to the portion you’re currently eating, keeping the bulk of the soup plain. Store extra chopped herbs in ice cube trays with a little water or oil for easy, pre-portioned additions to reheated soup.
Broth Reduction Management: During storage and reheating, broth evaporates and vegetables/noodles continue absorbing liquid. Always keep extra broth (homemade or store-bought) on hand to refresh stored soup. Add ¼ cup at a time until you restore the proper soupiness.
Conclusion
This homemade chicken noodle soup proves that the best chicken noodle soup near me isn’t found by searching Google Maps—it’s made in your own kitchen with fresh ingredients, traditional techniques, and a fraction of the cost. With tender chicken, perfectly cooked noodles, and golden broth that rivals any restaurant, this recipe delivers superior flavor, nutrition, and satisfaction while giving you complete control over quality and ingredients. Whether you’re seeking comfort, healing, or simply a delicious meal, this soup becomes your new favorite answer to comfort food cravings.
Ready to stop searching “chicken noodle soup near me” and start making restaurant-quality soup at home? Give this recipe a try and let us know how it turns out in the comments below. Did you customize the vegetables? Discover your perfect noodle type? We’d love to hear about your soup-making experience! Leave a comment on our blog with your favorite variations and tips, and don’t forget to subscribe for more homemade recipes that beat restaurant versions every single time.
FAQs
Q: Can I use rotisserie chicken instead of cooking a whole chicken?
A: Absolutely! Using rotisserie chicken saves approximately 90 minutes. Use 3-4 cups of shredded meat and skip the broth-making steps (1-4). Start with 8 cups of quality low-sodium chicken broth at Step 6, then proceed as directed. While you’ll miss the depth of homemade broth, the shortcut still produces soup far superior to canned versions in just 30 minutes total time.
Q: Why does my soup look cloudy instead of clear like restaurant soup?
A: Cloudy soup results from boiling rather than simmering, which emulsifies fat and breaks down proteins. Always maintain a bare simmer (gentle, occasional bubbles) rather than a rolling boil. Skim foam during the first 15 minutes of cooking and strain thoroughly through fine-mesh or cheesecloth. Removing the fat layer also significantly improves clarity.
Q: How do I prevent noodles from soaking up all my broth?
A: Noodles absorb liquid continuously, even after cooking. For leftovers, always store noodles separately from broth and combine only when serving. Alternatively, slightly undercook noodles (2 minutes less than package directions) so they have less capacity to absorb liquid during storage. Some people cook noodles separately and add to individual bowls instead of the pot.
Q: Can this soup be prepared in a slow cooker or Instant Pot?
A: Yes! For slow cooker: Place chicken and aromatics in the slow cooker with water, cook on low for 6-7 hours, then strain, shred chicken, and proceed with assembly. For Instant Pot: Use the soup setting for 30 minutes with natural release, achieving similar results to 90 minutes of stovetop simmering. Both methods work excellently, though some prefer the control of stovetop cooking.
Q: What’s the best type of noodle for chicken soup?
A: Wide egg noodles are traditional and most popular, but personal preference matters most. Thin egg noodles cook faster (4-5 minutes), while wide noodles take 6-8 minutes. Orzo, small shells, or ditalini pasta work beautifully. For gluten-free, use rice noodles or gluten-free pasta. For low-carb, try zucchini noodles or shirataki noodles added during the last 3 minutes.
Q: How long does homemade chicken noodle soup last in the refrigerator?
A: Properly stored in airtight containers, chicken noodle soup lasts 4-5 days refrigerated at 40°F or below. Store noodles separately for best quality. The broth alone (without noodles) can last up to 5 days. Always reheat to 165°F before consuming. If soup develops an off smell, unusual color, or shows signs of mold, discard it immediately.
Q: Why add lemon juice to chicken soup?
A: Lemon juice is a restaurant secret ingredient that brightens all the flavors without making soup taste citrusy. It cuts through richness, enhances the savory notes, and adds complexity that makes people say “I can’t figure out what makes this so delicious.” The acid also helps your body absorb nutrients from the vegetables. Start with 2 tablespoons and adjust to taste.
Q: Can I make this soup without celery or with vegetable substitutions?
A: Definitely! While celery adds classic flavor, you can omit it or substitute with fennel, leeks, or additional onions. For carrots, try parsnips, sweet potatoes, or butternut squash. Some cooks add diced potatoes, mushrooms, or bell peppers. The beauty of homemade soup is customizing it to your preferences and what’s available in your kitchen.
Q: Is chicken noodle soup actually good for colds and flu?
A: Yes! Scientific studies confirm chicken soup’s benefits for upper respiratory infections. The hot liquid thins mucus and keeps you hydrated. Chicken provides protein for immune function. The anti-inflammatory compounds in the soup may reduce cold symptoms. The steam helps clear congestion. While it’s not a cure, chicken noodle soup genuinely supports your body during illness.
Q: How can I make my chicken soup taste more like restaurant or deli soup?
A: Restaurant secrets include: using bone-in, skin-on chicken for richer broth; adding whole peppercorns instead of ground pepper; finishing with fresh dill and lemon juice; using generous amounts of aromatics; and simmering low and slow rather than rushing. Properly seasoning at every stage and tasting/adjusting before serving ensures professional results. Don’t skip the fat-removal step—clean broth tastes more refined.